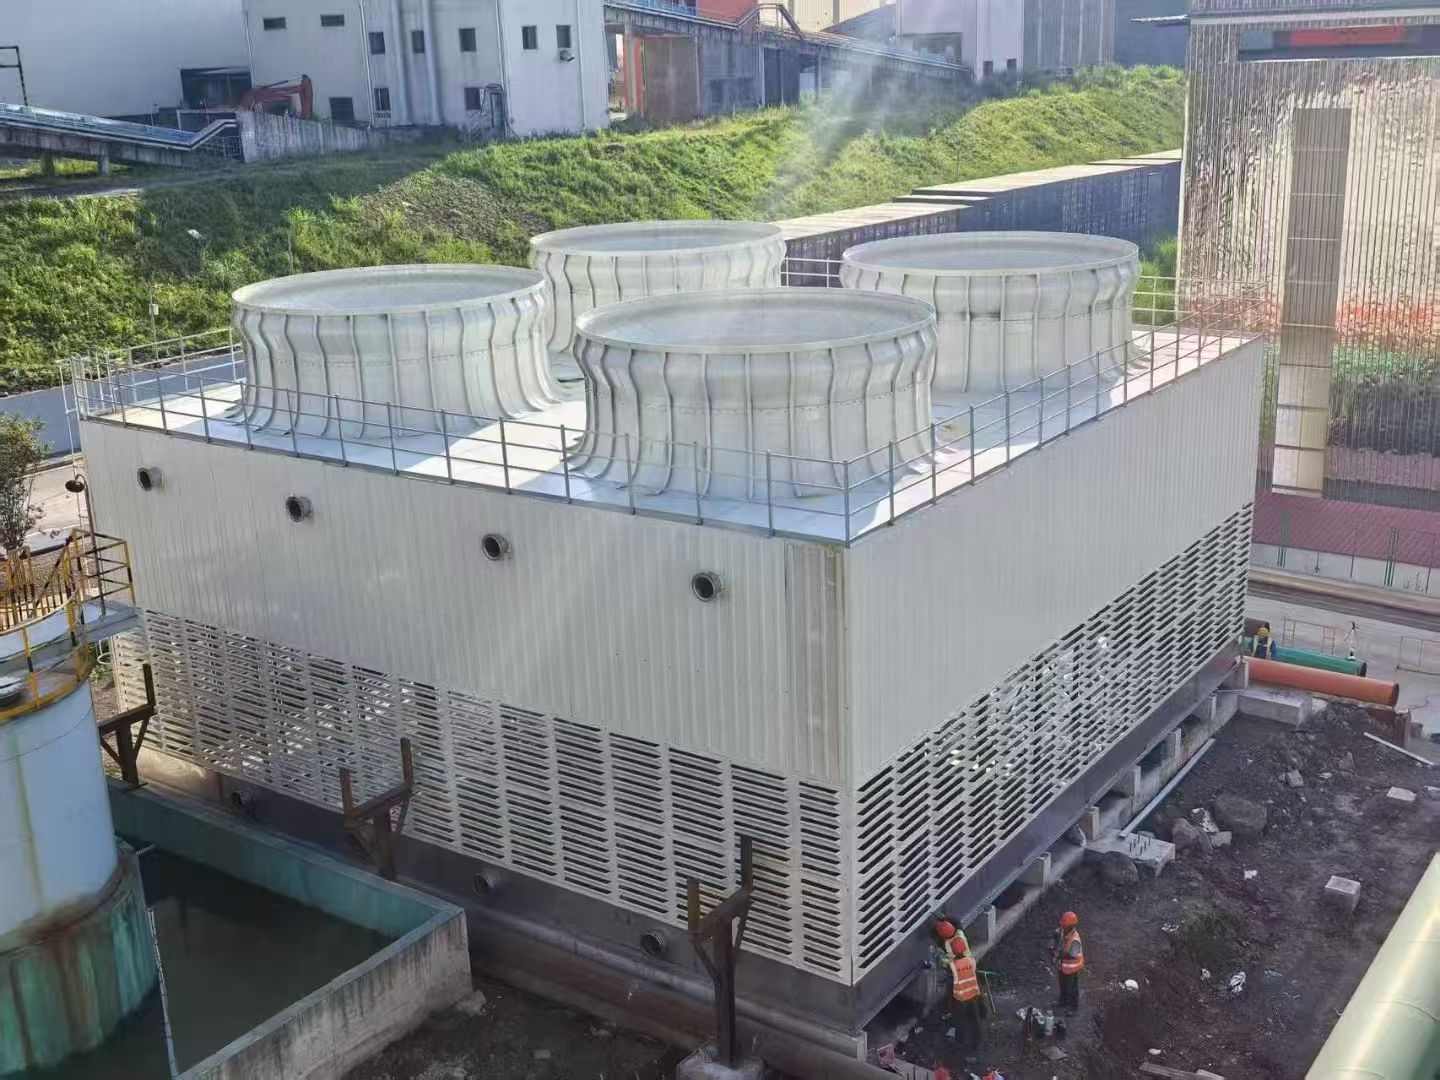
Fiberglass cooling tower fan stack replacement is an important maintenance task when an existing fan stack develops cracks, structural damage, severe weathering, or mounting problems. The fan stack directs exhaust air away from the cooling tower fan and helps maintain the intended airflow path. A damaged or incorrectly installed stack can affect airflow, increase maintenance requirements, and create safety risks.
Fiberglass-reinforced plastic (FRP) fan stacks are widely used because of their lightweight construction, corrosion resistance, and flexible design options. However, successful replacement requires accurate measurements, compatible materials, proper lifting procedures, and careful inspection.
This guide explains when to replace a fiberglass cooling tower fan stack, how to select a replacement, the main installation steps, and how to maintain the new component.
1. What Is a Fiberglass Cooling Tower Fan Stack?
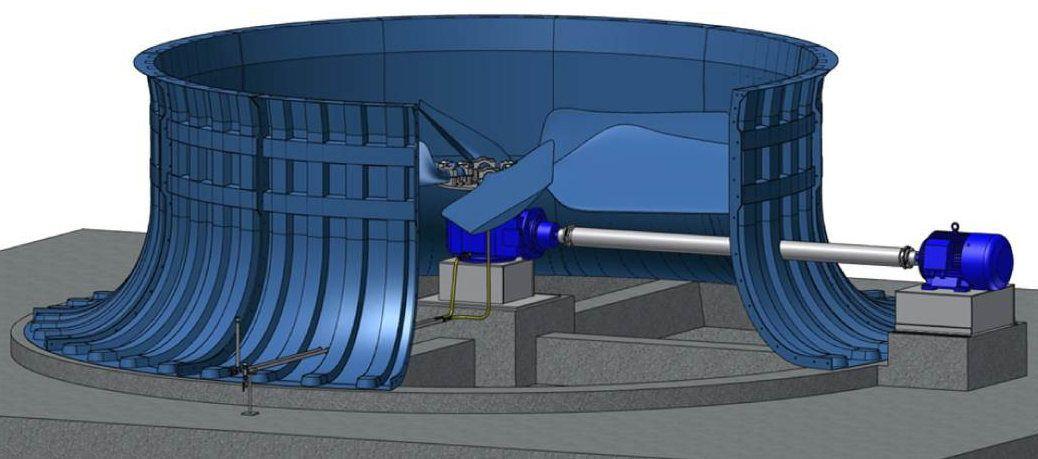
A fiberglass cooling tower fan stack is a cylindrical or tapered enclosure installed around the fan discharge area. It guides warm, moisture-laden air out of the cooling tower and helps establish the airflow passage required by the tower design.
FRP fan stacks typically combine glass-fiber reinforcement with a resin matrix, such as polyester or vinyl ester. The material system is selected according to structural requirements, temperature, chemical exposure, and outdoor conditions.
Fiberglass fan stacks are commonly installed on induced-draft cooling towers used in power plants, manufacturing facilities, chemical processing plants, and commercial HVAC systems.
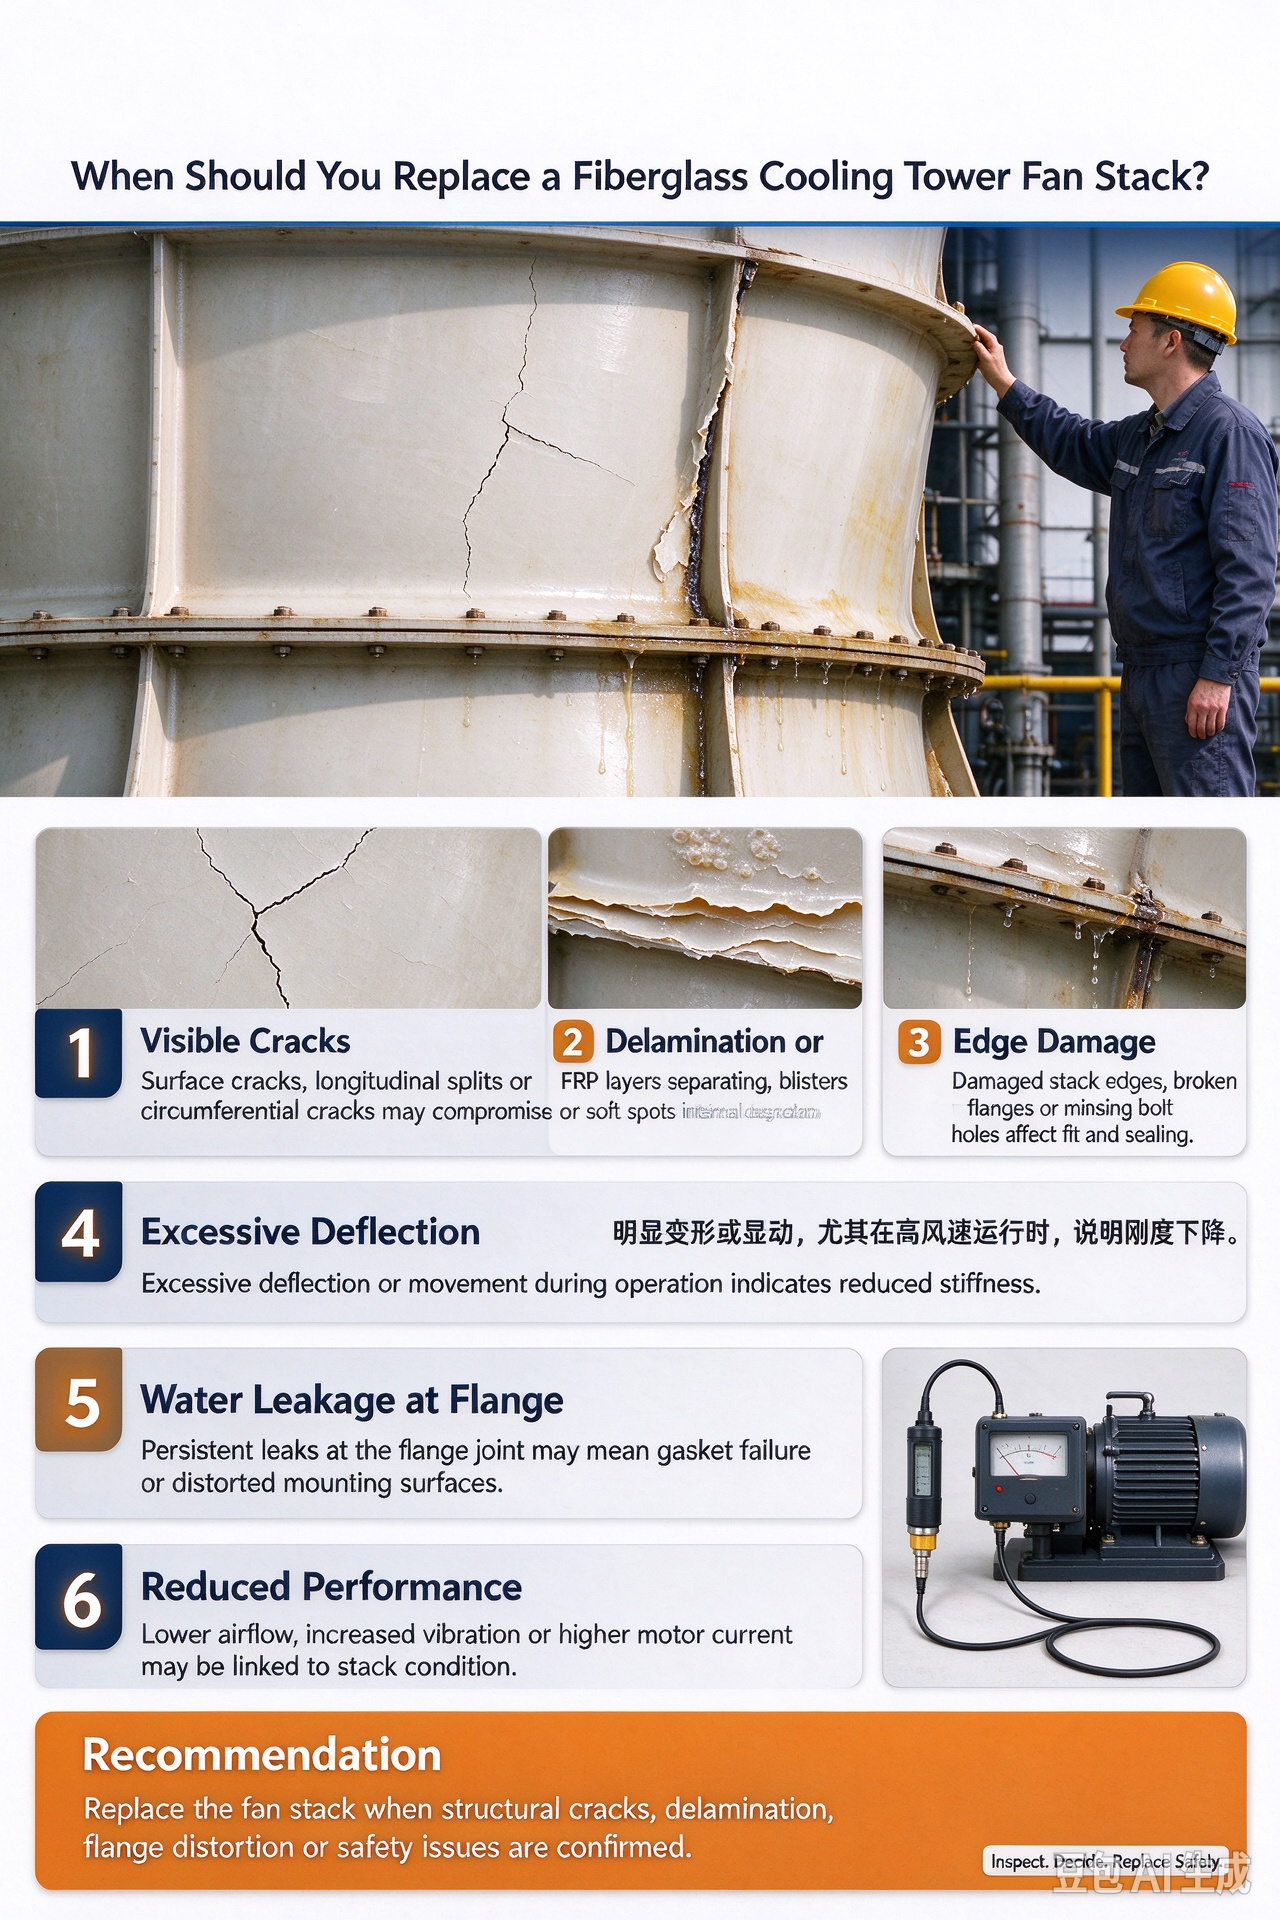
2. When Should You Replace a Fiberglass Cooling Tower Fan Stack?
3. How to Choose the Right Replacement Fan Stack
Selecting a compatible fiberglass cooling tower fan stack is essential for reliable operation.
Confirm Dimensions
Measure and document the following:
Overall stack height and diameter.
Top and bottom diameters, if tapered.
Mounting flange dimensions and bolt-hole pattern.
Support arrangement and connection details.
Fan diameter and required blade clearance.
Use approved drawings whenever available. Do not rely on visual estimates alone.
Select the Appropriate FRP Material
Polyester resin is commonly used for general-purpose FRP applications. Vinyl ester or another specialized resin may be more suitable for certain chemical environments.
Consider operating temperature, humidity, chemical exposure, UV radiation, and expected mechanical loads when specifying the replacement.
Check Structural Compatibility
The replacement fan stack must be suitable for the site's wind loads, mounting conditions, vibration environment, and other applicable structural requirements.
Work with a Qualified Supplier
Provide the manufacturer with the existing cooling tower model, fan specifications, dimensions, photographs, and drawings. Request a technical drawing for approval before production, particularly for customized or aftermarket replacement products.
4. Tools and Preparations for Fan Stack Replacement
The tools and equipment required depend on stack size, weight, installation height, and site conditions.
Typical preparations may include:
Approved replacement fan stack and mounting hardware.
Measuring tools and installation drawings.
Suitable lifting equipment and certified lifting accessories.
Access platforms or approved fall-protection systems.
Appropriate hand tools and torque tools.
Inspection equipment and personal protective equipment.
Before starting, review the lifting plan, site risk assessment, manufacturer's instructions, and applicable safety procedures. Large fan stacks may require a crane or other engineered lifting arrangement.
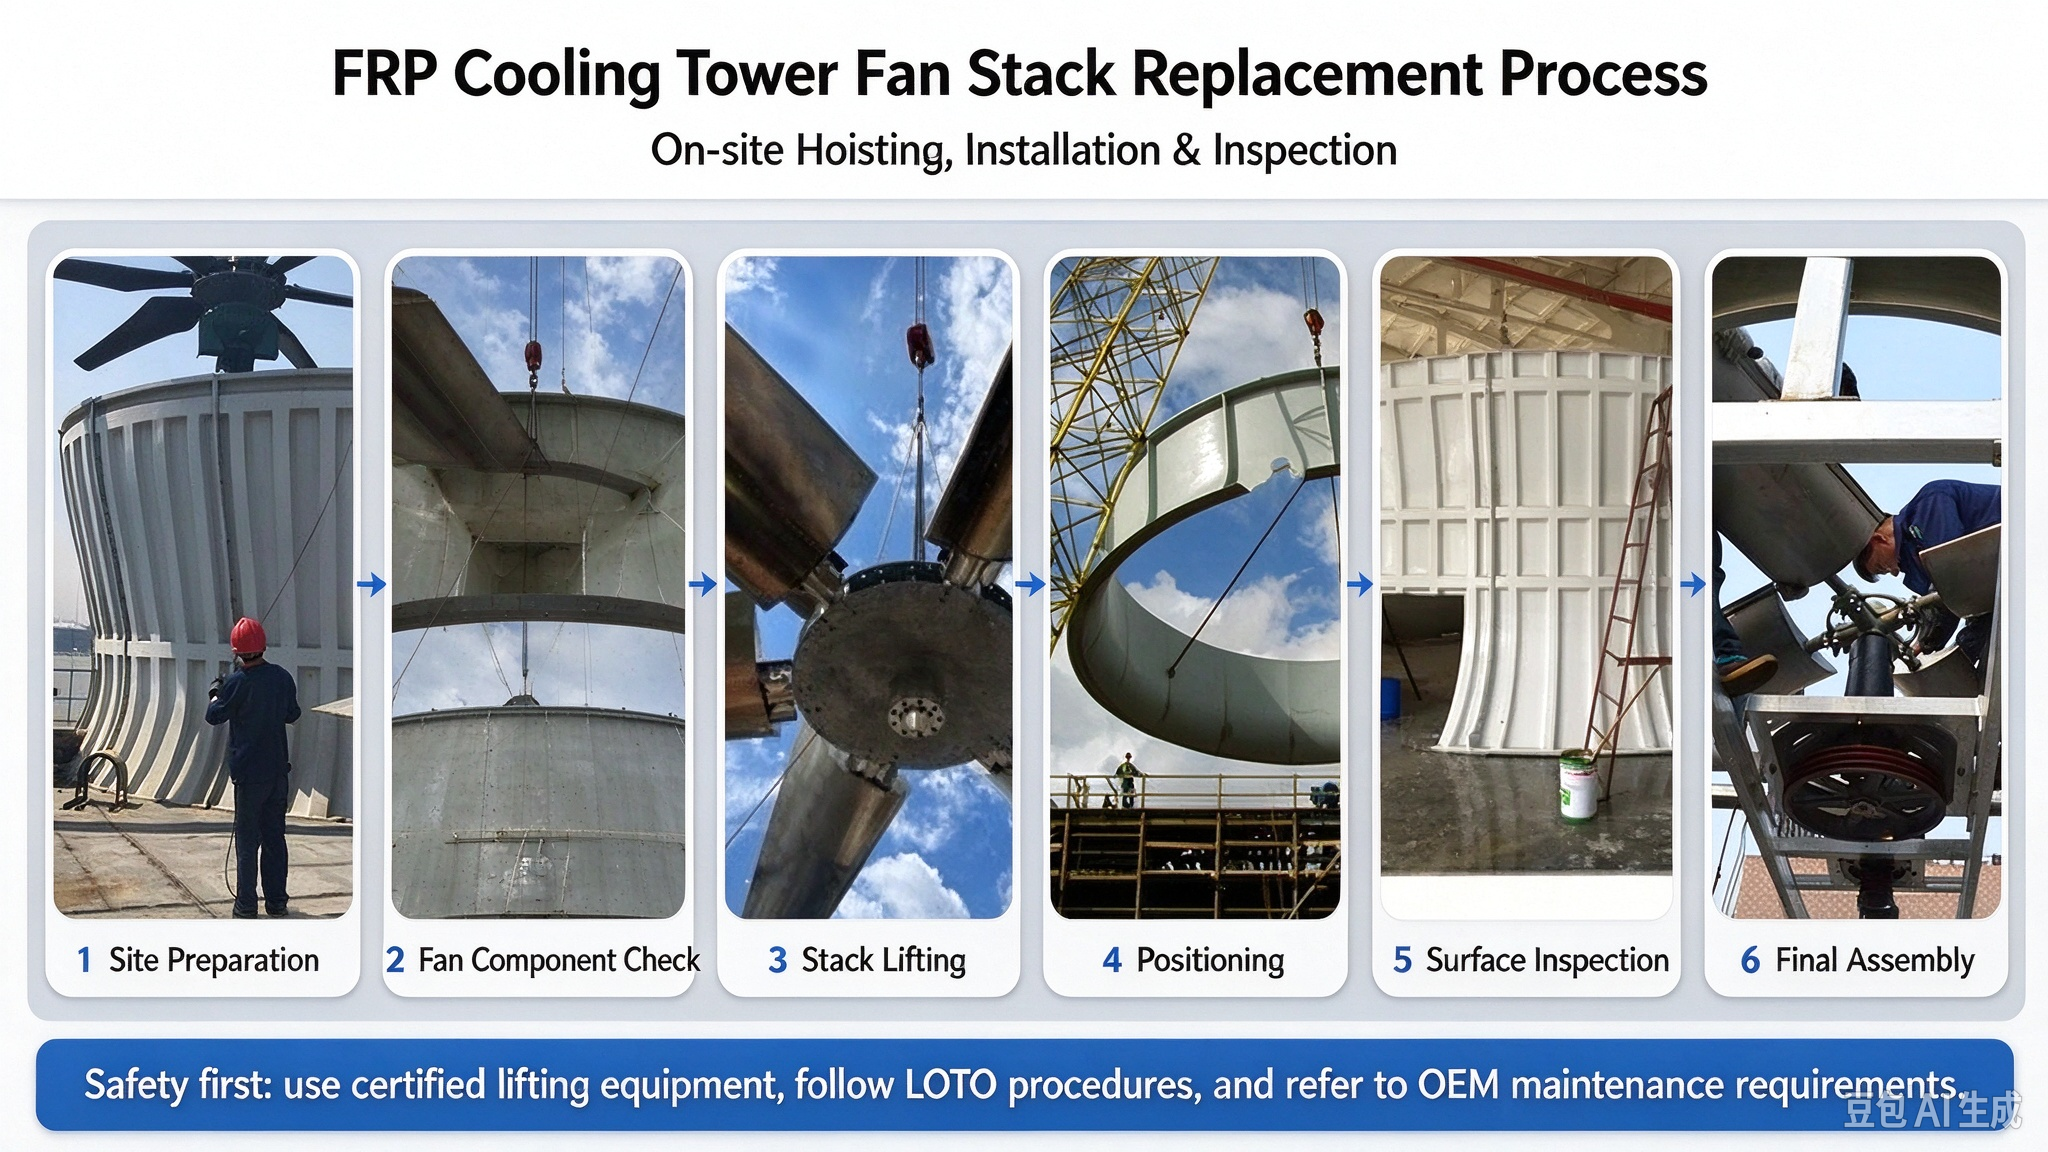
5. Step-by-Step Fiberglass Cooling Tower Fan Stack Replacement
Step 1: Shut Down and Isolate the Cooling Tower
Stop the cooling tower fan and follow the site's lockout/tagout procedures. Isolate the relevant electrical and mechanical energy sources, verify the equipment is safe to work on, and prevent unauthorized startup.
Step 2: Inspect the Existing Assembly
Examine the fan stack, mounting flanges, supports, fasteners, and surrounding structure. Check for corrosion, cracking, deformation, and damage caused by vibration.
Inspect the fan blades and drive system for obvious defects before proceeding. Record existing dimensions and connection details.
Step 3: Remove the Old Fan Stack
Support the existing stack using an approved lifting arrangement before releasing its connections. Remove fasteners in a controlled sequence and lift the stack without striking the fan, fan deck, or nearby equipment.
Never stand beneath a suspended load. Follow the approved lifting plan and keep personnel clear of the lifting area.
Step 4: Prepare the Mounting Surface
Once the old stack has been removed, inspect the supporting structure and mounting surface. Remove loose debris and replace damaged fasteners or repair defective supports as required.
Confirm that the mounting surface is level and that the support structure can accommodate the replacement.
Step 5: Position the New Fiberglass Fan Stack
Lift and position the replacement stack according to the manufacturer's handling instructions. Align its mounting flange with the existing support structure and verify the dimensions and bolt-hole pattern.
Do not force misaligned connections or drill additional holes without engineering approval. Resolve dimensional discrepancies before continuing.
Step 6: Secure the Mounting Connections
Install the specified fasteners and connection hardware. Tighten them according to the manufacturer's instructions and any applicable torque requirements.
Avoid excessive tightening, which can damage fiberglass flanges or create localized stress. Confirm that the stack is securely supported and correctly aligned.
Step 7: Check Fan Clearance and Alignment
Verify the clearance between the fan blades and the stack around the full circumference. Check the fan's position, mounting connections, and surrounding structure for possible interference.
The required clearance must follow the cooling tower or fan manufacturer's specifications. Do not assume the original clearance remains correct after a replacement.
Step 8: Complete the Inspection and Startup
Remove tools and temporary lifting equipment, confirm that all personnel are clear, and ensure all guards and safety devices are installed.
After authorized personnel complete the required inspections, restore the equipment according to the site's startup procedure. Observe the fan for abnormal vibration, unusual noise, or signs of interference. Stop the equipment immediately if a potentially unsafe condition appears.
6. Common Installation Mistakes to Avoid
Avoid these common errors during fiberglass cooling tower fan stack replacement:
Ordering a replacement without verifying dimensions.
Selecting an unsuitable resin for the operating environment.
Ignoring damaged support structures or mounting flanges.
Using incompatible fasteners or excessive tightening force.
Failing to verify fan blade clearance.
Lifting the stack without an approved lifting plan.
Restarting the cooling tower before completing safety inspections.
Correcting these issues before startup helps reduce the risk of equipment damage, delays, and repeat replacement work.
7. Maintenance After Replacement
Regular inspections help extend the service life of a new FRP fan stack.
Inspect the surface: Look for cracks, impact damage, exposed fibers, and delamination.
Check fasteners: Inspect mounting connections for loosening, movement, or damage.
Monitor vibration: Investigate unusual fan vibration, which may indicate imbalance, alignment problems, or structural issues.
Check weathering: Examine exposed surfaces for UV deterioration and damage to protective coatings.
Keep records: Document inspection findings, repairs, and any changes to operating conditions.
Inspection frequency should reflect the manufacturer's recommendations, site conditions, and operating history.
8. How to Reduce Fiberglass Fan Stack Replacement Costs
Replacement costs depend on stack dimensions, laminate specifications, resin type, customization, lifting requirements, labor, and shipping.
To manage total project cost:
Provide accurate measurements and drawings before requesting quotations.
Confirm compatibility before manufacturing begins.
Compare material specifications rather than price alone.
Plan replacement during scheduled maintenance where practical.
Inspect supports and fasteners to avoid repeat installation work.
Evaluate the manufacturer's technical support and warranty terms.
For industrial buyers, a properly specified replacement can help reduce avoidable downtime and maintenance expenses.
Frequently Asked Questions
How long does it take to replace a fiberglass cooling tower fan stack?
The time required depends on stack size, access, lifting arrangements, weather, and the condition of the supporting structure. A site-specific plan is necessary to estimate downtime accurately.
Can a damaged FRP fan stack be repaired instead of replaced?
Minor surface damage may be repairable using an approved FRP repair procedure. Significant cracking, delamination, or structural damage requires professional assessment before deciding whether repair is appropriate.
Can I use an aftermarket fiberglass fan stack?
Yes, if the replacement meets the required dimensional, structural, material, and operational specifications. Confirm compatibility with the cooling tower manufacturer or a qualified engineer.
What is the most important step before ordering a replacement?
Verify the stack dimensions, mounting details, fan clearance, operating environment, and structural requirements. Approved drawings help reduce the risk of ordering an incompatible component.
Why is fan clearance important?
Insufficient clearance can allow fan blades to contact the stack, potentially damaging the fan, stack, or surrounding equipment. Follow the applicable manufacturer's clearance specifications.
Conclusion
Fiberglass cooling tower fan stack replacement requires careful planning, accurate measurements, suitable FRP materials, and a controlled installation process. Inspecting the supporting structure, verifying fan clearance, and following approved lifting and safety procedures are essential for reliable operation.
For a successful replacement project, work with an experienced cooling tower component supplier, approve technical drawings before manufacturing, and establish a regular maintenance schedule after installation. These steps help protect equipment reliability and support long-term cooling tower performance.
Recommended internal links for CoolingTowerPart.com:


